Running Bevel DLT network on Minikube
Pre-requisites
Before proceeding, first make sure that you’ve completed Developer Pre-requisites.
Clone forked repo
If you have not already done so, fork bevel and clone the forked repo to your machine.
cd ~/project
git clone git@github.com:<githubuser>/bevel.git
Add a “local” branch to your machine
cd ~/project/bevel
git checkout -b local
git push --set-upstream origin local
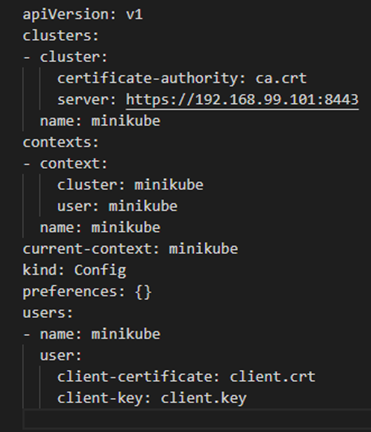
Update kubeconfig file
Create a
buildfolder inside your Bevel repository:cd ~/project/bevel mkdir buildCopy ca.crt, client.key, client.crt from
~/.minikubeto build:cp ~/.minikube/ca.crt build/ cp ~/.minikube/client.key build/ cp ~/.minikube/client.crt build/
Copy
~/.kube/configfile to build:cp ~/.kube/config build/
Open the above config file and remove the paths for certificate-authority, client-certificate and client-key as in the figure below.
NOTE: If you ever delete and recreate minikube, the above steps have to be repeated.
Copy gitops file from ~/.ssh to build. (This is the private key file which you used to authenticate to your GitHub in pre-requisites)
cp ~/.ssh/gitops build/
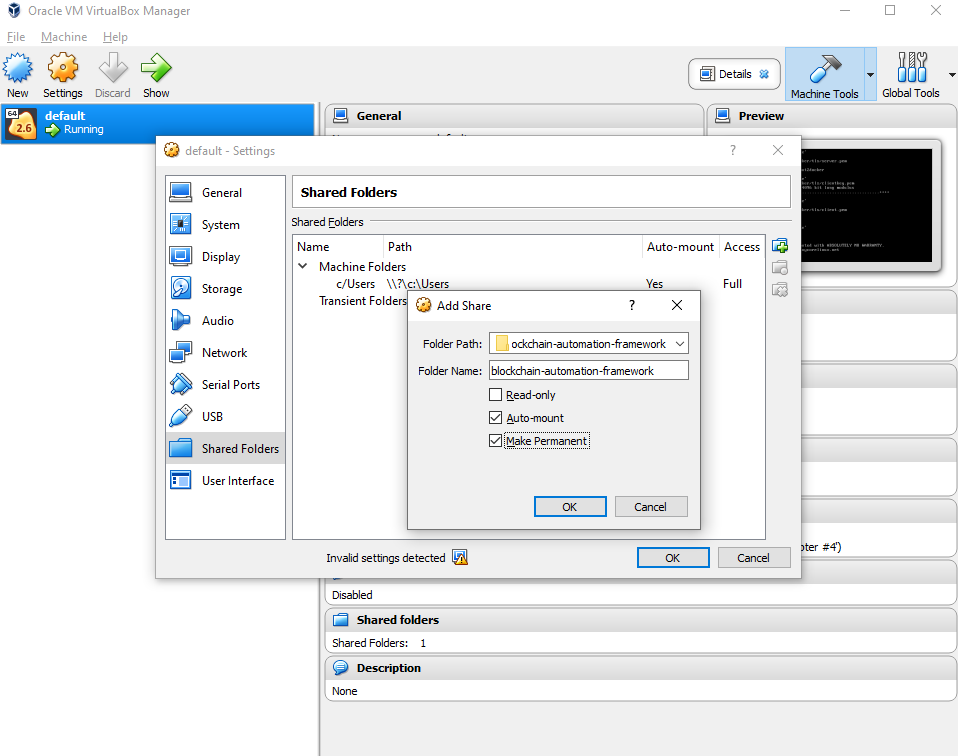
Additional Windows configurations
Ensure that you have set the following git config before cloning the repo.
git config --global core.autocrlf falseIf not, update the EOL to LF for platforms/hyperledger-fabric/scripts/*.sh files.
Execute following to correctly set docker environment.
eval $('docker-machine.exe' env)
Mount windows local folder (bevel folder) to VirtualBox docker VM ( the machine named “default” by default) from right-click menu, Settings -> Shared Folders. All paths in network.yaml should be the mounted path. Shut down and restart the “default” machine after this.
Edit the configuration file
Choose the DLT/Blockchain platform you want to run and copy the relevant sample network.yaml to build folder; rename it to network.yaml.
cd ~/project/bevel
cp platforms/hyperledger-fabric/configuration/samples/network-minikube.yaml build/network.yaml
Update Docker configurations:
docker:
  url: "ghcr.io/hyperledger"
  # Comment username and password as it is public repo
  #username: "<your docker username>"
  #password: "<your docker password/token>"
For each
organization, update ONLY the following and leave everything else as is:vault: url: "http://<Your Vault local IP address>:8200" # Use the local IP address rather than localhost e.g. http://192.168.0.1:8200 root_token: "<your vault_root_token>" gitops: git_url: "<https/ssh url of your forked repo>" #e.g. "https://github.com/hyperledger/bevel.git" git_repo: "<https url of your forked repo without the https://>" #e.g. "github.com/hyperledger/bevel.git" username: "<github_username>" password: "<github token/password>" email: "<github_email>"
If you need help, you can use each platform’s sample network-minikube.yaml:
- For Fabric, use
platforms/hyperledger-fabric/configuration/samples/network-minikube.yaml - For Quorum, use
platforms/quorum/configuration/samples/network-minikube.yaml - For Corda, use
platforms/r3-corda/configuration/samples/network-minikube.yaml
And simply replace the placeholder values.
NOTE: If you have 2-Factor Authentication enabled on your GitHub account, you have to use GitHub token. Otherwise, password is fine.
How To Generate GitHub Token
- On GitHub page, click your profile icon and then click Settings.
- On the sidebar, click Developer settings.
- On the sidebar, click Personal access tokens.
- Click Generate new token.
- Add a token description, enable suitable access and click Generate token.
- Copy the token to a secure location or password management app.
For security reasons, after you leave the page, you can no longer see the token again.
Deploying the sample “supplychain” chaincode is optional, so you can delete the “chaincode” section. If deploying chaincode, update the following for the peers.
chaincode:
  repository:
    username: "<github_username>"
    password: "<github_token>"
Execute
Make sure that Minikube and Vault server are running. Double-check by running:
minikube status
vault status
Now run the following to deploy Bevel Fabric on minikube:
docker run -it -v $(pwd):/home/bevel/ --network="host" ghcr.io/hyperledger/bevel-build:latest
Windows users should use following (make sure that the local volume was mounted as per this step):
docker run -it -v /bevel:/home/bevel/ --network="host" ghcr.io/hyperledger/bevel-build:latest
Meanwhile you can also check if pods are being deployed:
kubectl get pods --all-namespaces -w
NOTE: If you need public address for nodes in your network.yaml file, you can use the output of minikube ip.
NOTE. baf-build image is using jdk14 but Corda and Corda Enterprise requires jdk8. In this case, you can use the prebuild image tag jdk8 ghcr.io/hyperledger/bevel-build:jdk8-latest
Troubleshooting
Failed to establish a new connection: [Errno 111] Connection refused
This is because you have re-created minikube but have not updated K8s config file. Repeat “Update kubeconfig file” steps 3 - 4 and try again.
kubernetes.config.config_exception.ConfigException: File does not exists: /Users/.minikube/ca.crt
This is because you have not removed the absolute paths to the certificates in config file. Repeat “Update kubeconfig file” step 4 and try again.
error during connect: Get http://%2F%2F.%2Fpipe%2Fdocker_engine/v1.40/version: open //./pipe/docker_engine: The system cannot find the file specified. In the default daemon configuration on Windows, the docker client must be run elevated to connect. This error may also indicate that the docker daemon is not running
This is because docker isn’t running. To start it, just close all the instances of Docker Quickstart Terminal and open again.
ERROR! the playbook: /home/bevel/platforms/shared/configuration/site.yaml could not be found
This is because the bevel repository isn’t mounted to the default VM. Check this step.