Deploying a DLT network on Minikube using Bevel
Pre-requisites
Before proceeding, first make sure that you've completed the Developer Pre-requisites.
Setup minikube on VM
You can also setup minikube on a Ubuntu VM. 1. Setup a Ubuntu 20.04 VM with atleast 16 GB RAM, 8 vcpu and having a public ip address, either on any cloud provider or local machine
Get public IP
To set and get a public ip address of VM, check associated cloud provider documentation. For example: for azure
Open https://ipv4.icanhazip.com/ on browser to get the public ip.
- Install minikube using instruction here and start minikube.
- Start a proxy which is required for ansible controller(to be created later in following steps) to access the minikube k8s
Clone forked repo
Important
For Windows, ensure that you have set the following git config before cloning the repo.
- If you have not already done so, fork bevel and clone the forked repo to your machine.
- Add a “local” branch to your machine
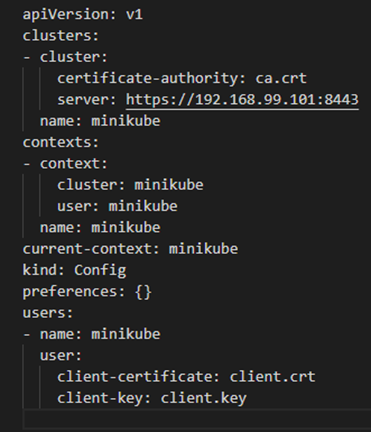
Update kubeconfig file
- Create a
buildfolder inside your Bevel repository: - Copy ca.crt, client.key, client.crt from
~/.minikubeto build: - Copy
~/.kube/configfile to build: -
Open the above
configfile in build directory and update file path for certificate-authority, client-certificate and client-key to point to the respective files copied in build directory.
If using Ubuntu VM, update config
servervalue to following:
Important
If a VM is created on a cloud provider please ensure that required ports are open for traffic.
Warning
If you ever delete and recreate minikube, the above steps have to be repeated.
Setup Hashicorp Vault
Tip
If you haven't followed Vault setup instructions or want to deploy Vault on Kubernetes itself, please watch this video from 17:17 minutes from this Bevel workshop series
-
Get your local IP Address for Vault. Follow this guide to get your machine's local IP Address.
-
In a new terminal, execute the following (assuming
vaultis in yourPATH):
Additional configurations
- For Windows, execute following to correctly set docker environment.
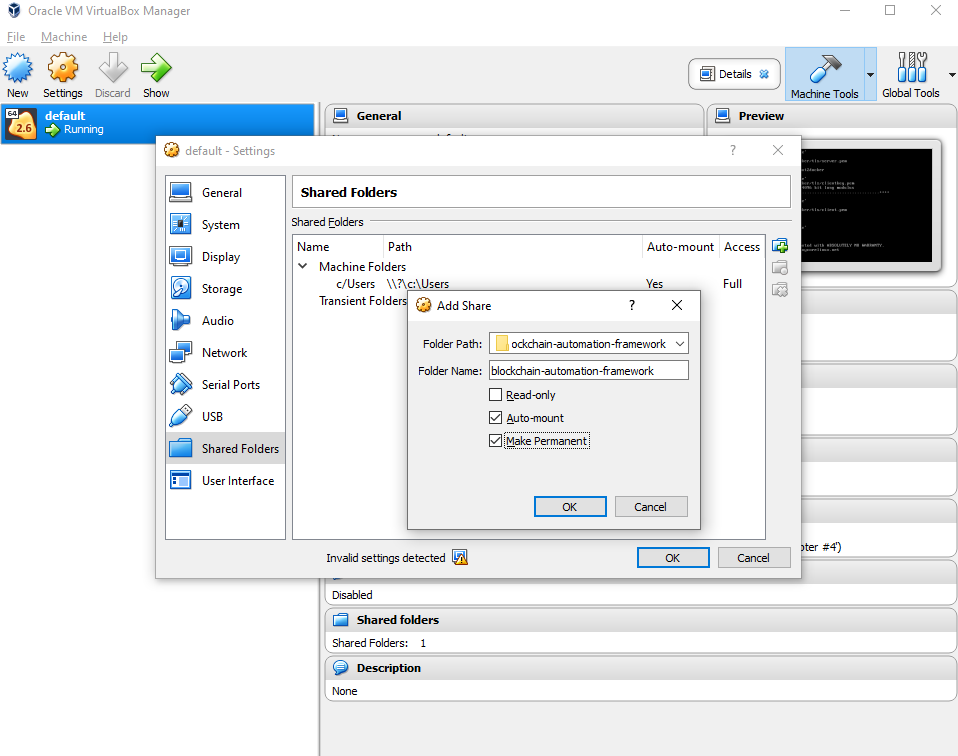
- For Windows, mount local folder (bevel folder) to VirtualBox docker VM ( the machine named “default” by default) from right-click menu, Settings -> Shared Folders. All paths in network.yaml should be the mounted path. Shut down and restart the "default" machine after this.

- For Mac, mount the local folder using minikube mount as we are using minikube as the docker runtime. This terminal window should be kept open. If you close this terminal you have to minikube stop and start to overcome the error when re-mounting.
Edit the network configuration file
-
Choose the DLT/Blockchain platform you want to run and copy the relevant sample network.yaml to build folder; rename it to network.yaml.
-
Open the above
build/network.yamlin your favourite editor and update the following. -
Update Docker configurations:
- For each
organization, update ONLY the following and leave everything else as is:cloud_provider: minikube k8s: context: "minikube" config_file: "/home/bevel/build/config" vault: url: "http://<Your Vault local IP address>:8200" # Use the local IP address NOT localhost e.g. http://192.168.0.1:8200 root_token: "<your vault_root_token>" gitops: git_protocol: "https" # Option for git over https or ssh git_url: "<https/ssh url of your forked repo>" #e.g. "https://github.com/hyperledger/bevel.git" git_repo: "<url of your forked repo without the https://>" #e.g. "github.com/hyperledger/bevel.git" username: "<github_username>" password: "<github token>" email: "<github_email>"
Note
If you have 2-Factor Authentication enabled on your GitHub account, you have to use GitHub token. Otherwise, password is fine.
How To Generate GitHub Token
- On GitHub page, click your profile icon and then click Settings.
- On the sidebar, click Developer settings.
- On the sidebar, click Personal access tokens.
- Click Generate new token.
- Add a token description, enable suitable access and click Generate token.
- Copy the token to a secure location or password management app.
For security reasons, after you leave the page, you can no longer see the token again.
If you need help, you can use each platform's sample network-minikube.yaml:
- For Besu, use
platforms/hyperledger-besu/configuration/samples/network-proxy-none.yaml - For Fabric, use
platforms/hyperledger-fabric/configuration/samples/network-proxy-none.yaml - For Indy, use
platforms/hyperledger-indy/configuration/samples/network-minikube.yaml - For Quorum, use
platforms/quorum/configuration/samples/network-minikube.yaml - For Corda, use
platforms/r3-corda/configuration/samples/network-minikube.yaml
And simply replace the placeholder values as explained above.
Note
Deploying the sample “supplychain” chaincode for Fabric is optional on minikube, so you can delete the “chaincode” section. If deploying chaincode, update the following for the peers.
Execute provisioning script
Make sure that Minikube and Vault server are running. Check by running:
Now run the following commands to deploy your chosen DLT on minikube:
Important
If you need public address for nodes in your network.yaml file, you can use the output of minikube ip.
Note
bevel-build image is using jdk14 but Corda and Corda Enterprise requires jdk8. In this case, you can use the prebuild image tag jdk8 ghcr.io/hyperledger/bevel-build:jdk8-latest
While the playbook is running, you can check if pods are being deployed from a different terminal
Tip
There will be errors in Ansible playbook, but if they are ignored, then that is expected behaviour.
Troubleshooting
Failed to establish a new connection: [Errno 111] Connection refused-
This is because you have re-created minikube but have not updated K8s
configfile. Repeat "Update kubeconfig file" steps 3 - 4 and try again. kubernetes.config.config_exception.ConfigException: File does not exists: /Users/.minikube/ca.crt-
This is because you have not removed the absolute paths to the certificates in
configfile. Repeat "Update kubeconfig file" step 4 and try again. error during connect: Get http://%2F%2F.%2Fpipe%2Fdocker_engine/v1.40/version: open //./pipe/docker_engine: The system cannot find the file specified. In the default daemon configuration on Windows, the docker client must be run elevated to connect. This error may also indicate that the docker daemon is not running-
This is because docker isn't running. To start it, just close all the instances of Docker Quickstart Terminal and open again.
ERROR! the playbook: /home/bevel/platforms/shared/configuration/site.yaml could not be found-
This is because the bevel repository isn't mounted to the default VM. Check this step.
Ansible controller could not access kubernetes or vault-
Please make sure that VM has a public IP and required ports are open. One can verify vault status or accessing K8s using kubectl commands